

Mastering a new Mac.
Today is my dad’s birthday. His present was a MacBook Pro. Dad is a newcomer to the Mac, after using Windows for many years. Like the helpful son I am, I came to the rescue! I wrote what I thought would be a few hands tips on using the Mac, but it ballooned into a massive list of tips and philosophical differences with Windows.
Although I wrote this guide for my dad, I thought it would be a shame not to share it with everyone. There’s so much here that even experienced Mac users might find a couple of useful tips, but it’s specifically aimed at newbies. Share it with your family and friends, and share your tips in the comments section!
First things first: two fingers to an old myth
Macs can right click! If I had a pound for every moron who made a joke about Macs not having a right click while in my last job, I would have at least thirteen pounds by now.
Tap with two fingers on the trackpad to right click. If you click on the Apple logo and go to System Preferences (the Mac’s Control Panel equivalent), then choose Trackpad, it’ll show you an overview of some handy gestures. You don’t even need to push until the trackpad physically clicks if you check the ‘Tap to Click’ box.
One really great function that most people forget: right click on the name of a document in its window to show where it lives on your Mac. Right click on a blank space in an application’s toolbar and you can customise the bar’s contents.
Command your Mac, don’t Control it
You have probably noticed that your keyboard isn’t the same as the one on your previous computer. The @ key and ” have switched places. The other key you might need is a # which you can type by pressing Option/ Alt and 3.
In Windows you use Control as the main modifier key; on a Mac, you use Command (Cmd) instead. Macs use Ctrl in combination with a mouse click to do a right click (from the days when Macs really did only have one button). Anywhere you would normally use the Ctrl key, just use Cmd. Copy and paste are Cmd-C and Cmd-V, etc. To select multiple items in a list, hold Cmd and click them all.
More Keyboard Tips
Other keyboard commands are genuinely different from Windows. Here are some of the most common/ confusing ones:
When you have a file selected in the Finder, press Enter to rename it. Or you can continue to do that thing where you click on the file, then wait a while, then click it again, then it either lets you rename the file or opens it depending on the computer’s mood. I prefer Enter.
To open a file you have selected in the Finder, you press Cmd-O. Remember: O for Open!
The backspace key works the same as Windows, but it’s not called Backspace- it’s called ‘Delete’. To delete to the right (what I would call a ‘Forward Delete’) hold the Fn key and press Delete. Fn is in the bottom-left corner of the keyboard.
To move a file to the Trash, press Cmd-Delete.
Press the Space bar when you have a file selected to quickly look at its contents. This is called ‘Quick Look’ and is really useful for PDFs and Word documents. Pinch open the window and it will fill the whole screen. One caveat is that you can’t edit documents from the Quick Look window.
To quit an open application, press Cmd-Q instead of Alt-F4.
You might wonder where Page Up and Down, Home and End keys have gone. If you hold Fn, you can press the following keys to duplicate their functionality:
- Up Arrow = Page Up
- Down Arrow = Page Down
- Left Arrow = Home
- Right Arrow = End
Not that anyone uses them these days!
The Eject key in the top-right corner of the keyboard ejects a CD or DVD.
The Mac equivalent to Ctrl-Alt-Del is Cmd-Opt-Esc. Of course, Macs never crash, so you won’t need to use that.
Press your MacBook’s power button to quickly get to the Shut Down menu. If you close the lid, it’ll go to sleep. If you reopen the lid, it’ll wake up immediately.
Ask ten people whether you should shut down a Mac or just close the lid and put it to sleep and you’ll get ten different answers. My rule of thumb is: if I’m finished with the computer for the day, or going out for several hours, I’ll turn it off. Otherwise, I’ll put it to sleep. Just like real lions, Macs will quite happily sleep all day.
Spotlight
Press Cmd – Space to activate Spotlight, or click the spyglass in the top right corner of the screen. This is my favourite Mac feature: it has dramatically changed the way I use a computer, and I think once you get used to it you’ll feel the same. Just open Spotlight and type to do the following:
- Search for files, emails, contacts, calendar appointments
- Launch Applications
- Define dictionary terms (you can even type the name of an application like ‘Finder’ and the Mac will tell you its function)
- Search the web and Wikipedia
It’s the bee’s knees- much faster than manually browsing for files.
Things That Are Different: A Disorganised List
Application preferences are always found in the same place in the menu bar. Click the name of the application and you’ll find Preferences, Hide and Quit, etc. This brings me to a related point…
On the Mac, the menu bar is always at the top of the screen- not the top of the application window. This means you always know where to move your mouse pointer!
The left-side of the menu bar changes to reflect the application ‘in focus’ i.e. the one you’re currently using. ‘Finder‘ is a bit like ‘Windows Explorer’: it is always running and cannot be closed. It is integrated into the window manager (i.e. the graphical user interface).
Amazing pro-tip: you can scroll text in a web browser or document without actually clicking on that window- just hover your mouse pointer over the document and swipe with two fingers. Wow!
Memory sticks, printers etc. don’t install drivers when you plug them in. Hard drives and memory sticks just work. You can browse them from the Finder. I like setting up my Mac so memory sticks and hard drives mount on the desktop: you can set this up under the ‘General’ tab of Finder preferences. To eject a memory stick, drag it into the Trash on the Dock, which will change to an eject symbol.
Macs are really easy to back up with Time Machine. Plug in a hard drive and the Mac will ask you if you want to back up your computer using Time Machine. Say ‘Yes’. That’s all there is to it. It will warn you if you haven’t backed up in a fortnight.
Macs use a different drive format to Windows, called HFS+. Windows computers can’t read Mac hard drives. Macs can read and write FAT and FAT32 formats, but they can’t write to NTFS volumes- it’s read-only. If you have an external hard drive that you want to use with Time Machine, you’ll probably need to format it before using. Time Machine takes care of this automatically, but make sure the data is on your Mac before you wipe the drive!
Hard drives on Macs don’t have letters. The top level of your hard drive is ‘Macintosh HD’, divided into subfolders. Your personal data is stored in a Home folder. The absolute path to this location is Macintosh HD/Users/
Mac files don’t need extensions like .txt and .jpg, strictly speaking. The file type is contained in metadata i.e. hidden files-within-files that contain information on the file format. That said, most files will have extensions, and Macs know how to handle them.
A final, conceptual point about how windows work: traditionally in Windows, a window corresponds to an application. When you close the window, it quits the application. You might remember older versions of Microsoft Word stacking lots of different document windows within a single window- this is why. On a Mac, a window corresponds to a document. Documents exist independently of any application; there is no ‘frame’ like Windows. This has changed a little with Windows 7, but Photoshop and many popular applications still behave this way.
If you close the window, the application will still be running. To quit an application, you can use Cmd-Q. This means you can leave a web browser or text editor running, with no documents open, and click its Dock icon to immediately open a new document.
Applications
Macs handle applications differently to Windows. They are stored in /Applications. Applications have a .app extension (Macs don’t use .exe) and are actually self-contained bundles with all of the files they need to run. This is why you can uninstall them easily, which I’ll come to later.
Downloaded apps usually come in the form of a .dmg or a .pkg:
.dmg is a disk image. When you double click, it mounts on your Desktop. Think of it as plugging in a memory stick containing the application: we need to get this app off the stick and into the Applications folder.
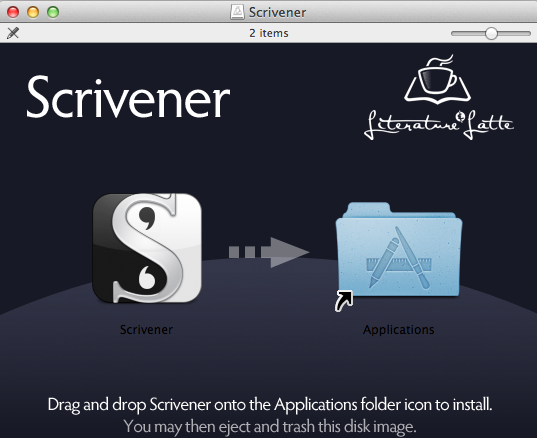
Most applications pop up a little window when you open their dmg, with a shortcut to the Applications folder. Click and drag the application from the window onto the shortcut- it will copy into Applications. If there is no nice window, open a new Finder window (Cmd-N!) and drag the application that way. Your mouse cursor will show a green plus, which means the file is being copied and not moved. Once the application is copied, unmount (‘eject’) the disk image by dragging it to the Trash.
.pkg and .mpkg are packages. These are similar to a Windows installer and will dump files in other locations in addition to /Applications. Double click and follow the on-screen instructions.
Mac App Store applications will be downloaded straight into the right place.
Macs come with Preview, a really fast PDF and image viewer. You don’t need Adobe Reader. Don’t install it. It’s rubbish. If you have already installed it, please uninstall it and pretend you never did. I’ll not judge you. We all make mistakes: I downloaded it when I first got my Mac, too!
To uninstall an application, drag it to the Trash. That’s it! There are very few exceptions and typically these will have used a .pkg installer, like Flash Player or Microsoft Office.
Managing your Media
iTunes and iPhoto are designed to manage your files, so you don’t have to. It’s best to let them handle it: photos and music are already full of metadata which can be used to sort and search through them. To save a lot of pain, do the following:
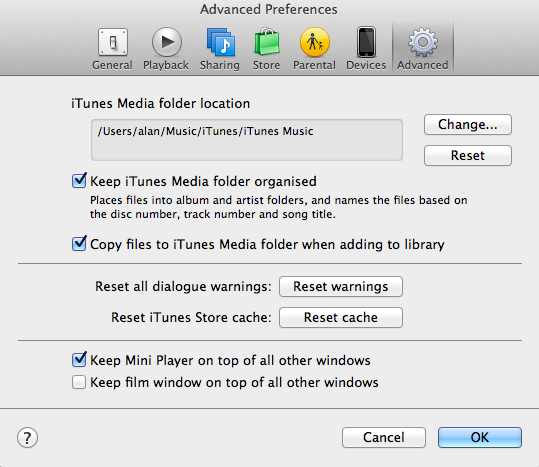
iTunes: under the ‘Advanced’ tab of Preferences, check ‘Keep iTunes Media folder organised’ and ‘Copy files to iTunes Media folder’. Now go to the File menu and choose Library –> Organise Library. Check both boxes and click OK. iTunes will reorganise and assimilate all of your media into its own folder structure.
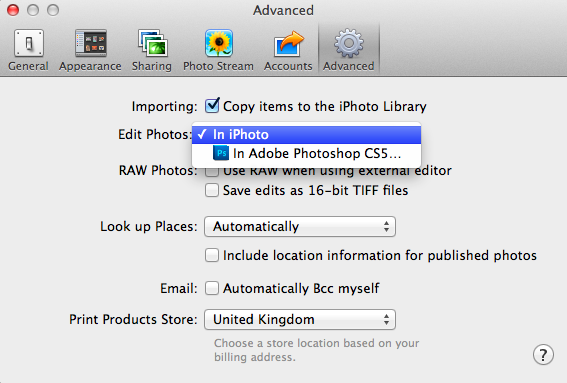
iPhoto: under the ‘Advanced’ tab of Preferences, check ‘Copy items to the iPhoto Library’. Now you can be confident that every file in iPhoto is stored within the iPhoto library, which looks a single file but is actually a series of folders in disguise. This means you can delete photos from memory cards, safe in the knowledge that they are on the Mac.
And Finally… Things I Would Install (But You Might Not)
Firefox
I don’t Safari and now don’t like Chrome either (it doesn’t play nice with enterprise configurations). This is purely ideological: they’re all very similar, but I use a lot of Firefox extensions and it’s worth having if a website doesn’t render properly in Safari.
DaisyDisk
Similar to Treesize for Windows, Daisydisk is a really nice way to visually see your free hard drive. I covered this in more detail in another article.
Messages Beta
Send iMessages for free from your Mac to anyone who has an iPhone or iPad! (You’ll know on your phone, because the conversations are blue.) This requires a little tweaking with your Caller ID or you won’t receive the replies- hopefully Apple will fix this when Mountain Lion is released.
Aperture or Photoshop Lightroom 4
iPhoto is pretty good for managing photos, but if you’ve got a DSLR it lacks the fine-grained control of images and photo organisation that I’ve come to appreciate with more professional software. I would play with iPhoto and see if it meets your needs. If you find it lacking, consider:
Apple’s Aperture is only £40 on the App Store. It integrates well with iOS features like Photo Stream. It will import your library from iPhoto very nicely.
Lightroom is £100, but it’s much faster (especially on Macs with less than 8GB of RAM) and has a more intuitive user interface. It doesn’t manage your photos from a central library like Aperture, relying on a traditional folder structure like a Windows application. It will make good photos look incredible with very little effort.
If I had to buy one of these, I would choose Lightroom, but it depends how serious you want to get with photography.
I would never install any ‘Clean your Mac’ application like MacKeeper etc. Ever. The only exception is a really good app called Cocktail, again detailed elsewhere, but even Cocktail is only really a pretty front-end for some UNIX commands that you could type into a command line for free!
You’ve made it to the end of this insanely long document! Next time, I’ll show you how to SSH into your Mac from a UNIX command line and grep through your crash logs. Maybe.
Further Reading:
A detailed review of Mac OS X Lion.